Bicep is an Azure-native IaC solution that facilitates the provisioning of resources by transpiling into ARM template. It is a declarative domain-specific language (DSL) that is easier to read and maintain.
Installation
Azure CLI is required to use Bicep related commands. To verify the installation, use az version and it will show the installed Azure CLI components in a JSON format.
{
  "azure-cli": "2.77.0",
  "azure-cli-core": "2.77.0",
  "azure-cli-telemetry": "1.1.0",
  "extensions": {}
}
After that, install the Bicep module by using the bicep install command.
az bicep installThis will output something like below:
Installing Bicep CLI v0.37.4...
The configuration value of bicep.use_binary_from_path has been set to 'false'.
Successfully installed Bicep CLI to "C:\Users\User\.azure\bin\bicep.exe".
Use bicep version to check for installed version.
az bicep versionTo upgrade, simply run the upgrade command.
az bicep upgradeBasic Usage
Declaring a resource in Bicep follows the syntax. The resource keyword signifies that the following is a resource declaration. The <Variable> holds the reference to the provisioned resource, that can be used further in the script. The <ResourceType> is a valid Azure resource type which can be found at templates page, under the Reference section group by their respective category. The <DateVersion> indicates which API version that should be used for provisioning the resource. Within each declaration block, we can specify parameters and its value that constitutes to the resource itself.
resource <Variable> '<ResourceType>@<DateVersion>' = {
  parameter: value
  parameter2: value2
  ...
}
The following is an example of declaring a storage account.
resource storageAccount 'Microsoft.Storage/storageAccounts@2023-05-01' = {
  name: 'mydemostorage'
  location: 'eastus'
  sku: {
    name: 'Standard_LRS'
  }
  kind: 'StorageV2'
  properties: {
    accessTier: 'Hot'
  }
}
This file can be executed by running the deployment group create command. Note that the <existing-resource-group> refers to the name of an existing resource group.
az deployment group create \
  --template-file main.bicep \
  --resource-group <existing-resource-group>
The command above provisions the main.bicep at the resource group level. On the other side, the command below provisions the main.bicep at the subscription level using the sub subcommand.
az deployment sub create --location eastus --template-file main.bicepBasic Syntax
Just like a programming language, Bicep offer ways to make the code ergonomic and composable by using variables, loops, modules and functions. Bicep does not use semicolon.
Variables
Variables can be declared with var keyword. We can use string interpolations in the variables as well. Below demonstrates using the storage account's location variable as part of the name declaration.
var storageAccountLocation = 'eastus'
var storageAccountName = 'mydemostorage${storageAccountLocation}'

resource storageAccount 'Microsoft.Storage/storageAccounts@2023-05-01' = {
  name: storageAccountName
  location: location
  sku: {
    name: 'Standard_LRS'
  }
  kind: 'StorageV2'
  properties: {
    accessTier: 'Hot'
  }
}
Variables can hold any valid data types supported.
Loops
Loops can be used with arrays to deploy multiple resources without repeating the code. For instance, we can use loops to create multiple storage accounts of different locations specified in an array. The elements in an array can be delimited by newline \n or comma ,.
var regions1 = ['eastus', 'northeurope', 'uksouth']
var regions2 = [
  'southeastasia'
  'westeurope'
]
Below is an example of using the array regions1 to deploy storage accounts to eastus, northeurope and uksouth. The name must be interpolated with index or the region to be unique across Azure.
resource storageAccount 'Microsoft.Storage/storageAccounts@2023-05-01' = [for (region, index) in regions1: {
  name: 'mystorage${region}${index}'
  location: region
  sku: {
    name: 'Standard_LRS'
  }
  kind: 'StorageV2'
  properties: {
    accessTier: 'Hot'
  }
}]If Statement
If statement can be used to conditionally deploy a resource. For example, there might be some resource that is only required in the specific region. In that case, we can give a conditional clause to deploy the said resource.
resource storageAccount 'Microsoft.Storage/storageAccounts@2023-05-01' = if (region == 'uksouth') {
  name: 'mystorage${region}${index}'
  location: region
  sku: {
    name: 'Standard_LRS'
  }
  kind: 'StorageV2'
  properties: {
    accessTier: 'Hot'
  }
}Functions
Bicep comes with a lot of built in functions for manipulating the data types that it supported. Here are a few examples showcasing the use of a few functions for string type and array type. The full list can be found on the official documentation.
String can be concatenated with the concat function and converted to uppercase with toUpper function.
var hello string = 'hello'
var helloWorld string = concat(toUpper(hello), ', world!') // HELLO, world!
Arrays can be merged without duplicates using the union function.
var array1 = [1, 2, 3]
var array2 = [2, 3, 4]

var result = union(array1, array2) // [1, 2, 3, 4]
A custom function can be created with the keyword func that takes in some input and returns an output value.
func prefixName(prefix string, name string) string => '${prefix}_${name}'
func add(num1 int, num2 int) int => num1 + num2Modules
Using modules allows us to group related resources in a logical manner that represents the architecture of the resources accurately. A module contains three main parts: parameters, resources and outputs.
Parameters are the data that is passed in by the caller, denoted with the param keyword. The resources are the actual resources that will be created by the module and outputs is the important info of the created resources that the caller might be interested to get hold of, such as resource ID.
The examples below is a module to deploy an App Service or Web App. As App Service requires an App Service Plan, this module is also provisioning that.
@description('Location for all resources.')
param location string

@description('Name of the App Service Plan.')
param appServicePlanName string

@description('Name of the Web App.')
param webAppName string

@description('Environment of the deployment.')
@allowed([ 'dev', 'prod' ])
param environmentType string

@description('Tags to apply to all resources.')
param tags object = {}

var appServicePlanSkuName = (environmentType == 'prod') ? 'P2V3' : 'F1'

resource appServicePlan 'Microsoft.Web/serverfarms@2024-11-01' = {
  name: appServicePlanName
  location: location
  sku: {
    name: appServicePlanSkuName
  }
  tags: tags
}

resource webApp 'Microsoft.Web/sites@2024-11-01' = {
  name: webAppName
  location: location
  properties:{
    serverFarmId: appServicePlan.id
    httpsOnly: true
  }
  tags: tags
}

@description('The default hostname of the web app.')
output webAppHostName string = webApp.properties.defaultHostName
The first two lines indicates that this module takes in parameters such as location of type string and annotated with optional @description to convey the meaning of the required parameter.
It also uses a ternary operator at appServicePlanSkuName to determine the SKU needed based on the environment environmentType as typical production environment needs a more beefy computation.
Then, it provisions the App Service Plan under the symbolic name appServicePlan with the provided parameters and variables, and provision the Web App under the said App Service Plan at line serverFarmId: appServicePlan.id.
Finally, it returns the webAppHostName of the newly created Web App.
This is how to use the module.
module appService 'modules/appService.bicep' = {
  name: 'appService'
  params: {
    location: location
    appServicePlanName: appServicePlanName
    webAppName: webAppName
    environmentType: environmentType
    tags: tags
  }
}
The values returned can be used by calling the outputs property.
// Use this variable wherever you want.
var appName = appService.outputs.webAppHostName
The full code can be found on my GitHub repository.
Existing Resource
Bicep can refer to preexisting resource without the need to reprovision them. It can be declared using the existing keyword as shown below.
var exampleRG = 'example-rg'

resource existingStorage 'Microsoft.Storage/storageAccounts@2025-06-01' existing = {
  name: 'examplestorage'
  scope: resourceGroup(exampleRG)
}Parameterize Main File
The main file can be parameterized as well using the param keyword.
@allowed([
  'dev'
  'prod'
])
param environment string

module appService 'modules/appService.bicep' = {
  name: 'appService'
  params: {
    location: location
    appServicePlanName: appServicePlanName
    webAppName: webAppName
    environmentType: environment // Use it here
    tags: tags
  }
}
We can then use the --parameters flag in the deployment command to specify individual parameters.
az deployment group create \
  --resource-group my-rg \
  --template-file main.bicep \
  --parameters environment=dev
If there are a lot of parameters in the main deployment file, instead of passing them one by one in the command, we can use the Bicep parameter file that ends with .bicepparam extension to store them as code. This file is very similar of how docker-compose.yml works in Docker.
The example below defines an environment for the main.bicep module in the file named main.dev.bicepparam.
use 'main.bicep'

param environment = 'dev'
Then, in the deployment, we only need to refer to this parameter file using the parameter command.
az deployment group create \
  --resource-group my-rg \
--parameters main.dev.bicepparamTooling
VS Code Extension
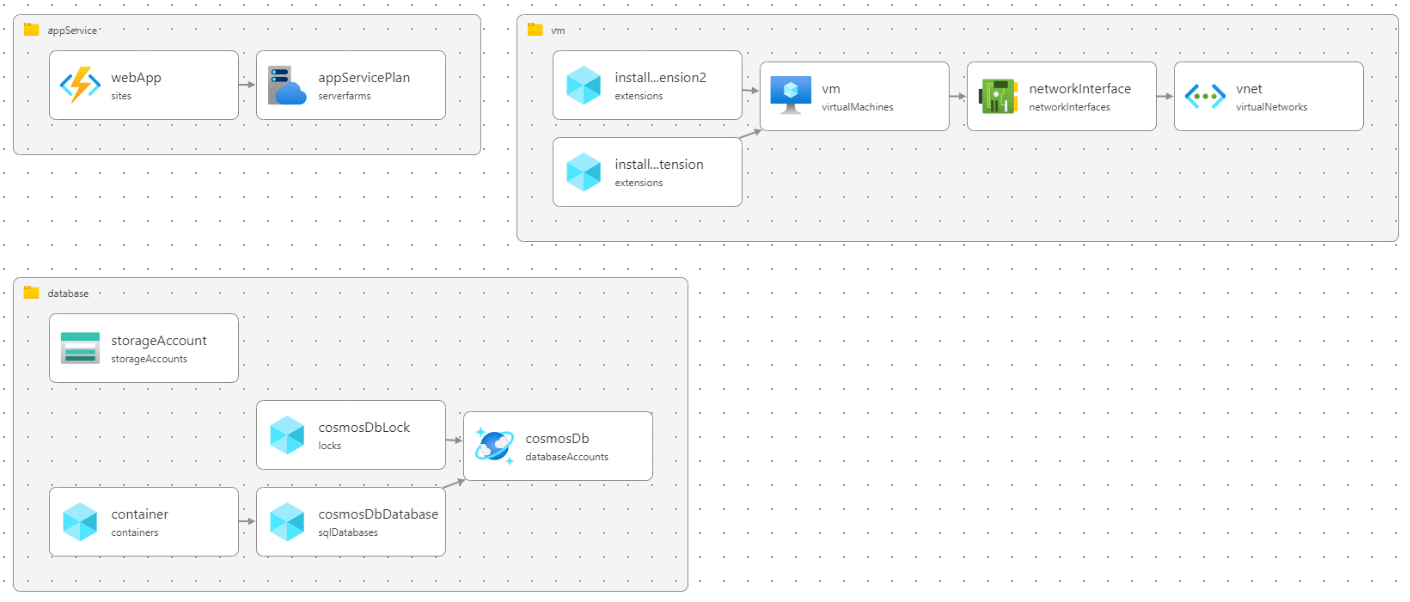
Bicep has a VS Code extension for syntax highlighting, intellisense, validation and a resource visualizer which is very handy to understand the deployment arrangement.
Linting
The Bicep file can be linted with the lint command.
az bicep lint --file <your-bicep-file>Formatting
The Bicep file can be formatted in-place with the format command.
az bicep format --file <your-bicep-file>Building
The Bicep file can be compiled into ARM Template in JSON format by using the build command. Alternatively, we can use the --outdir flag to specify the build directory.
az bicep build --file <your-bicep-file> --outdir <outdir>For the Bicep parameters file, it can be built with build-params command.
az bicep build --file <your-bicepparam-file> --outdir <outdir>What-If
Use what-if for previewing changes made to the resources in the environment before committing it. This can prevent any accidental destruction during the deployment.
az deployment group what-if --resource-group my-rg --template-file main.bicep